Friday, 16 October 2015

Sneak Peak!! The Bats are coming!!


When I get back from my super busy weekend I will show you how to create a Halloween Bat Cave of your own!!


This is one of the many craft tutorials for Halloween that will be coming your way!!


Don't worry nothing too scary ;)


Have an amazing weekend!! Treat yourself and do something you love!


I'll leave you with this to ponder.... This was the view from my office this morning... How can a day be bad when you have such amazing beauty surrounding you. Take time and smell the roses, find something you love and fulfil your dreams :).

-xo-

Wednesday, 14 October 2015

Quilting Art on Canvas - Tutorial

A modern way to display a quilt

Here we go again! Tutorial time!!!!

I created this pattern from a table runner pattern I saw in Sew it today magazine. I have changed the dimensions and the number of different fabrics that I used so that I could make it work for the size of my canvas.

Lets get started!!

***Tip: You can use scrap fabric, planned fabric or even a pre-cut jellyroll***

Supplies:
Sewing Machine
10 Different (Ironed) fabric patterns or materials each at least 2.5 inches wide and 30 inches long (I used a combo of cotton, fleece, and polyester)
Thread and a wound bobbin of matching thread
Scissors
Rotary Cutter and Self-Healing Mat
Hot Iron and Ironing board
Seam Ripper
Cutting Ruler, Large Clear Ruler
Canvas (mine was 20 x 16 inches)
Hot Gluegun (with glue stick)

Here we go!!
Cut strips of fabric
You will be cutting 2.5 inch squares; however that can be extremely time consuming. I mean really who wants to sit and cut 100 squares... Not me :) !!! So lets get smart and figure this out. Take your ten strips of fabric and cut the width down to 2.5 inches by at least 30 inches long (we will be trimming the length so that part does not need to be exact.)

Now that you have all of your fabric cut and ready we will get ready to sew! (sorry I don't have this picture I was too excited to get started sewing!!! Anyway it just looked like a pile of fabric, or half a unrolled jellyroll ;).

(Spoiler: I will be having tutorials using pre-cuts soon!!!)

Plan out your fabric order and set the fabric up on your table and place the right sides of the fabric together, matching the top of the fabrics, and sew a 1/4" seam down the right side seam.

Right sides together and sew away :)

Take your pattern to the ironing board and iron your seams in an alternating fashion. Press both seams in. 
The arrows show the seems pressed in
Now that you have all of your fabric together this is the interesting part. You will be sewing a tube and then we will be cutting your squares from here. 

Take your whole fabric, right sides together, and fold it so that the seams match (basically fold it in half) and sew the tube closed with a final 1/4" seam. Now you will fingerpress your fabric flat so that your seams match right up on the opposite side (this is why you alternate ironing so that they match up.) While you are fingerpressing the seems together you will feel them "lock into one another." If you have any questions about this part please shoot me a message or a comment and I can help answer any questions!

Now you will have a tube that looks like this (the little pile to the right is part f the tube I have already cut.. I know I know.. I get too excited and need to take more specific photos. Forgive me I was super excited for this!! Aren't you???) 
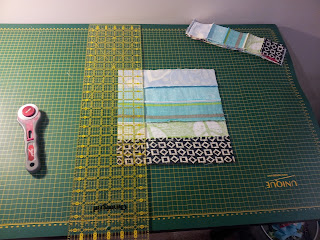
This tube has the other fabric underneath it, right sides facing.
Now this is where the fun starts :)

Cut 2.5 inches
Square up your tube by trimming the left side so it is all flush, 90 degree angle for the corners. Now you will measure 2.5 inches from the left side and cut your fabric with your rotary cutter. Continue to cut the 2.5 inch wide tubes until you run out of fabric. Or until you have the number of layer you want. I needed 9 cuts.

Here are the 9 tubes.

Now you will organize your tubes in line and get your seam ripper ready.

Rip one seam from each tube
Hi Mr. Seam Ripper, get ready to work!!


Keep an eye on the type of pattern you would like to create. If you would like diagonals the you can work your way down one tube at a time taking the seam ripper to each subsequent block. I wanted to create a "wave" or a point to mine (it kind of looks like a mountain and I love that!!)

layout your cut pieces together,
so that you can plan your pattern
*** Tip: If you rip out a seam and it is not part of your pattern, you can go back and resew the 1/4" seam and then go back and rip the correct seam you would like... Imagine how I know this :p***


We are almost done!!! can you see your pattern now??? I can and I'm Super Excited!!!!

Take your fabric strips and sew them all together with a 1/4" seam.
Sew Sew Sew!!
Now you will have your finished "Quilt Top".We will not be making a quilt sandwich this time though, we will be gluing it to the canvas. I re-ironed all the seams flat and placed hot glue on the corners of the canvas. 

To be honest I couldn't bring myself to ruin a full canvas by putting glue all over it. This way if I want to take the fabric off and use the canvas for different art I still can :) Frugal I know ;). If you would like to make your canvas more sturdy and make sure that the fabric is not going anywhere, then by all means glue away!! Just be careful the glue is hot hot hot and the heat will reach through the fabric!

We are done!!!
You are done!!! WOOHOO!!! I have placed this art over my workstation. Now I can look up and view my work when I need some inspiration. 

Remember before how I said it looked like a mountain, It helps to remind me that when you are fighting an uphill battle, there will always be a reprieve all you have to do is push on.

So Awesome!!
I hope you liked the tutorial!! Please reference this tutorial if you are using it. Also I would love to see your projects if you try!!! As always, if you have any questions or issues please contact me and I will be able to help!

Happy Crafting!! xo


Monday, 12 October 2015

Wonderful Holiday.. Now Back to the Grind

Happy Thanksgiving!!
I hope you all has an amazing time with family and friends. I was able to see most of my family and spend some good quality time with them and share the love and laughter that the holidays bring.

It was wonderful to be able to go back to my parents house and go to the old fall fair near where we used to live. The weather was absolutely amazing and I barely needed my jacket. The sun was shining and the crowd, waiting for the parade, was pumped up and excited for the beginning of fall and all that it brings!!

My boyfriend and I have been able to go back to this small fall fair and make our own memories to add to the plethora I have from when I was younger. I love it when the present collides with the best parts of the past! It always makes me smile and want to stop and enjoy each moment as it comes. We had delicious food with the most amazing company, topped off with home-made apple pies and home-made apple crisp with the respective families :).

So Delicious!!!!!
Fall is the most beautiful time of year. I may have stated this before bit I consider Autumn to be the mythical season. I believe that it is loved by so many and considered so beautiful because the beauty is fleeting, it is only here for a short time. The reason I believe that it is the mythical season is because it only happens once each year all around the world at the same time. You can move to the coast to experience spring all year round with temperate weather and rain; or you can move south, to the Caribbean or an island for summer all year round; or move up north for winter all year round. It is Autumn the elusive season that brings the most beauty and reminds us of the greatness that is nature, each and every year.

So Beautiful!
Now it is back to the desk job tomorrow, but the good things is that I will have these memories to keep me company on those rough days :).

Always remember that your perspective defines your happiness. There will always be down days, but if you remember and focus on the good days you will never be low :).


What is your favourite season?  In addition to that, what is your favourite Holiday??? I would love to know and hear about it!!

I hope you all had an amazing holiday and that you were able to make new memories and spend time with the people most important to you!!

-xo-

Wednesday, 7 October 2015

It's Almost Thanksgiving!


We are heading up to my parents house this weekend for our thanksgiving holiday. I am so excited be with family and watch silly movies and have delicious turkey and apple pie!! 

I will be posting a new tutorial soon!! 

Its an amazing time of year to remember the important things in life. Although we have this holiday to remind us, it is important to remember to take time everyday to be thankful for those you love and the little things in life that make each day special.

I would love to hear all about what you are thankful for.

Post soon ;)


Monday, 5 October 2015

Chocolate Pumpkin Cake Roll Recipe

Here We Go!

Kitchen Supplies:
Wax Paper
Cling Wrap
Clean Dish Towel
Baking Sheet
Spatula
Whisk or mixer
Three medium to large bowls
Separator bowls (for colours)
Plastic bag or piping bag or decorators bottle

Pumpkin Pattern
1 Egg
2 Tablespoons Sugar
1/3 Cup Flour
1 Tablespoon Melted Butter
Orange Food Colouring
Green Food Colouring

The Cake
4 Eggs, Separate whites and yolks
1 Tablespoon Sugar
1/2 Cup Sugar
1/4 Cup Butter, Melted
1/2 Cup Flour
1/4 Cup Cocoa Powder

Icing
I used store bought for today but will update with a new recipe soon!!

Instructions:
Preheat the oven to 400 degrees.

In a bowl combine 1 egg, 2 Tablespoons of Sugar, 1/3 cup of Flour, 1 Tablespoon Melted Butter, Mix well.


Using two of the separator bowls, Separate 1 Tablespoon of batter and add the Green food colouring, to your colour liking. Add the remaining batter into the other bowl and mix with the Orange food colouring, to the colour of your preferred pumpkin :). 

Separate into the decorating bag or bottle.

My Colours!!! Yay Pumpkins!!!
Set up your baking sheet with the waxed paper, you can use a template if you like, place it underneath the paper and trace with your batter colours. I like to free hand but I may try a template with a more delicate design in the future.

All Ready to go!!
Pumpkin Pumpkin Pumpkin!!!
What design  did you choose???? Hearts, Swirls, Dots, Flags, Faces, Notes, Story?? 
Please Share I would love to hear about it! 

Now that you have your decorative batter all set up place the pan in the freezer for about 20 mins, while you make the sponge cake.


Bring out the other big bowl and your mixer or whisk. Combine the 4 egg whites and 1 Tablespoon of Sugar. Mix on medium speed until they form soft peaks, a few minutes.

Yolks with the whites whipping away
While the machine is going, whisk by hand the egg yolks and 1/2 a cup of sugar until the egg yolks are a pale colour. Whisk in the 1/4 cup of melted butter.
Whipping is done and the yolks are done :)

Now fold in the whipped egg whites into the yolk and add the flour and cocoa powder and combine slowly. Do not over mix.

You are so close!! Are you getting excited???

Remove the baking sheet from the freezer and carefully spread the batter over the frozen pumpkin pattern. Gently spread the batter evenly on the baking sheet.

Bake for 7-8 minutes, do not over bake or the cake will crumble.

***I was too excited to roll at this point and I forgot to take pictures. ***
***I will update on my next try!!!***

Carefully remove the cake from the oven. Lay wax paper down and gently flip your cake out on top of it revealing your design!!!. Now lay your towel down on top of the cake and use the wax paper and the towel to flip the cake back down so the decorated side is down.

Carefully roll the towel and the cake together while it is warm and allow to cool for 30 minutes. Next unroll the cake and fill with Icing of your choice and gently re-wrap with the seam side down. Wrap the cake with cling wrap and chill in the fridge before serving!

Ready to Chill!
Now you are done!!! Amazing Job!!!
Delicious!!


 Keep me posted on your trials!!! Happy Baking!!!

Sunday, 4 October 2015

Chocolate Pumpkin Roll cake.

Soooo I learned a lot from this experience. 
Mainly that I need more practice with roll cakes :).
Overall the cake was amazing but the roll collapsed on me. I believe that I rolled it when it was too hot and I rolled it quickly.
This is the picture :). It was delicious!!
Next time I will take more time to roll it and let it cool a little. As for the designs, I think they turned out well; however, I will be using a decorator's bottle rather than a sandwich bag to pour the batter. I will have more control and more experience with the designs. There are many other designs I would like to try that require more finesse, which the bottle will help with. Don't wory I will keep you posted on those attempts as well...

Do you want to give it a try?
What do you think?


Overall it was really fun to try something new. 

I have never ever made a roll cake before and and I always seem to do, I jumped right in with both feet. I will 100% be making more, next time I will know to roll it and let it rest on the towel so it forms the initial shape and then fill it.

Come back tomorrow for the whole recipe with pictures and tips!

Did you try something new today? I would love to hear about it!!

Saturday, 3 October 2015

Sneak Peak - Chocolate Pumpkin Roll Cake

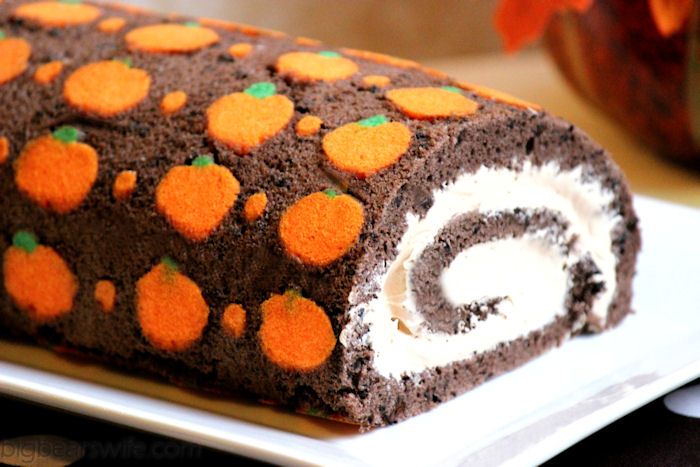
This weekend I will be trying a new recipe which I found from Pinterest! It's is a Chocolate Pumpkin Swiss Roll and it was designed by Angie at thebigbearswife.com. 
I will post pictures along the way but here is the link to Angie's blog and recipe, giving her the credit!! ;).
http://www.bigbearswife.com/2013/09/chocolate-pumpkin-swiss-roll-cake.html?m=1
More to see soon... I'm baking today to have for our family dinner tomorrow. Hopefully it looks half as good as hers! Wish me luck...
What are your fall treat try-me's?