So I wanted to get right into things, I am planning on posting about two posts a week. With one tutorial a week to start. I hope you all enjoy these tutorials and I welcome all positive comments and critiques. As you know this is my first blog and first tutorial and I will use your tips to grow and get better both for myself and to make my tutorials better for you!
 |
| These are the finished flower clips! |
Let's get started...
 |
| Both colours for the Bride! |
 |
| Smaller clips for the Bridesmaids! |
The inspiration for designing this fabric flower clip was from one of my girlfriends, she was planning a destination wedding and wanted to find really graceful and light looking flowers for the girl's hair and her wedding dress sash. Unfortunately I don't have the wedding pictures but I wanted to share these amazing flowers with all of you!
We discussed a few different styles of flowers and looked at many different types of flowers, both real and fake, to find the right ones. It was challenging because a lot of the fabric ones were too rigid or structured such as these below:
 |
| Ribbon Flower Tutorials will follow on a later date, Stay Tuned! |
We were able to decide on a type of flower that we wanted to model the clips after. Initially we thought that a wide water lilly would look okay but then before we got started we stumbled upon an image of a relaxed peony similar to this one.
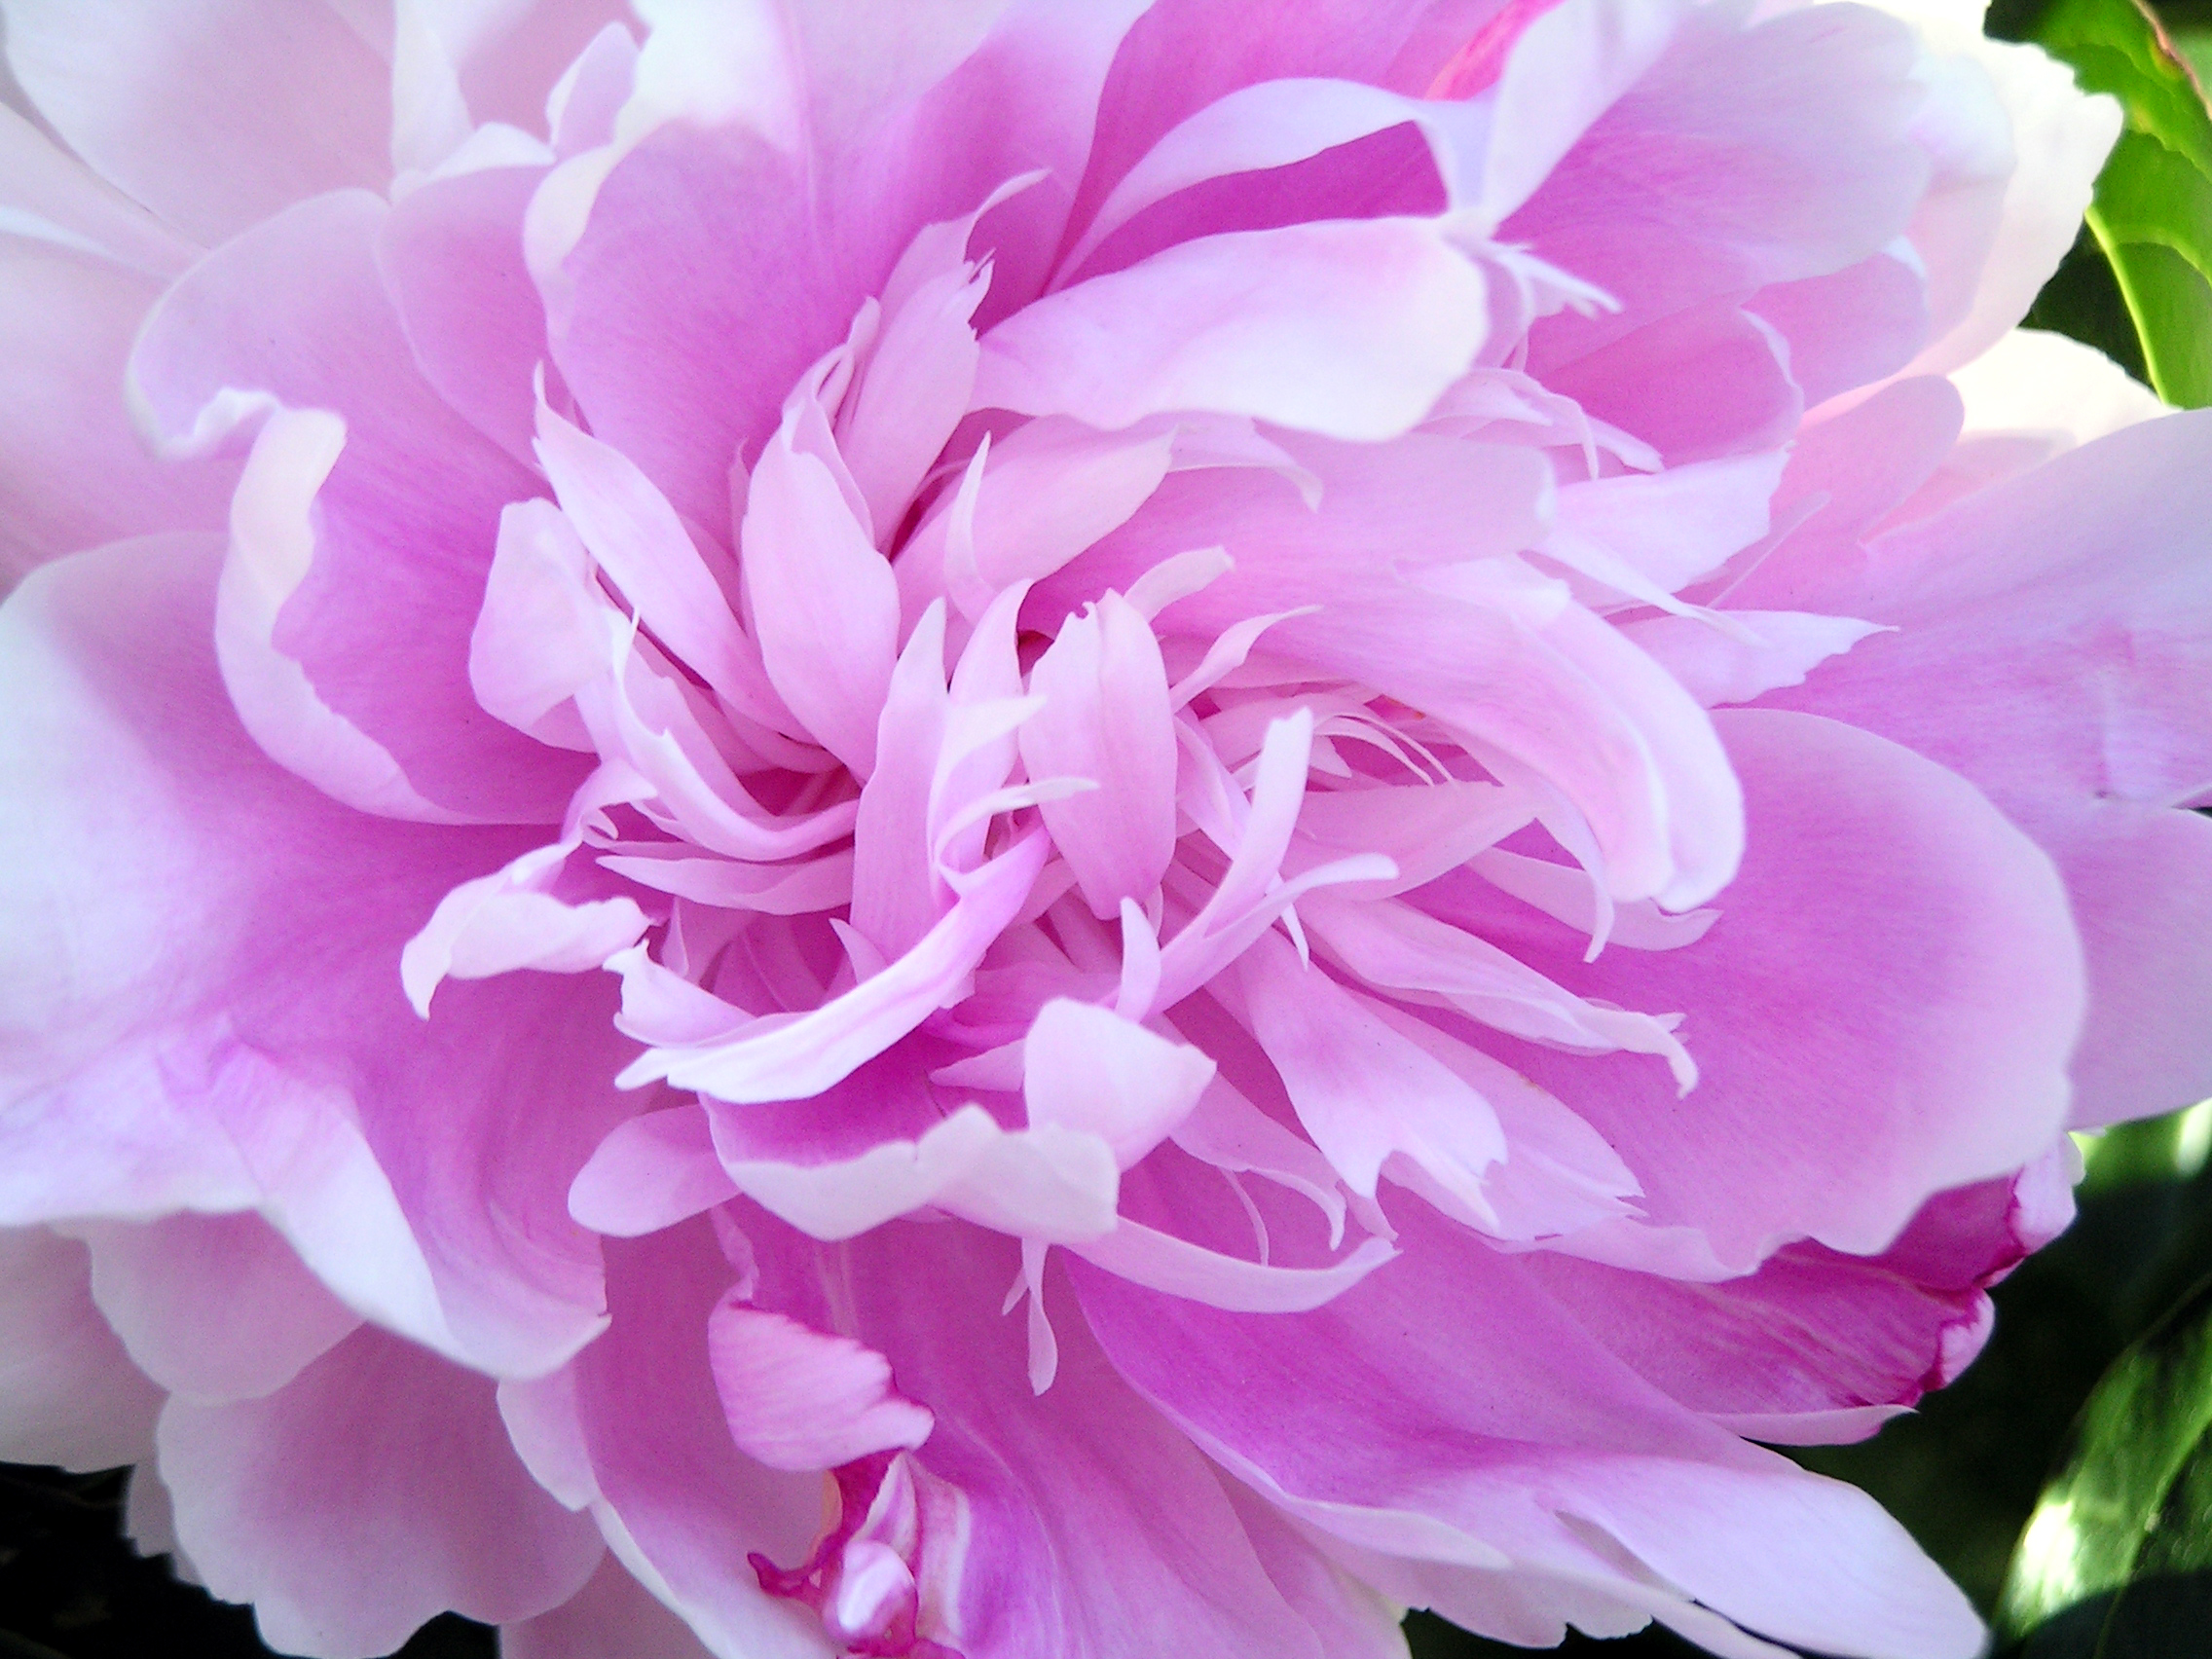 |
| Doesn't it feel like a beach flower?? So Beautiful! |
So I seem to be taking a stroll down memory lane, I digress, forgive me for my rambles!
Here we go...
I will be numbering the images and processes so if you require any clarification about the stages or anything I did please let me know :).
Getting Started: What you will need...
-Less than 1/2 yard for each fabric (depending on how many flower you will need this may change)
-Matching felt fabric, one sheet will be fine (depending on how many flowers you need)
-Matching Thread
-Sewing needle
-Sewing pins (plastic or glass head is fine)
-Small Embroidery Scissors, and stronger non fabric scissors (for cutting paper and cardboard).
-1 Sheet of paper
-1 Sheet of thin cardboard/poster board, nothing too bulky.
-Pencil or marking tools
-Alligator clips, Hair Clasps or Barrettes for your hair clip.
-Hot Glue Gun or White glue (and time)
-Decorative beads, sequins or gems for the centre of your flowers.
-Ruler or Measuring tape (if you require the flowers to be a specific size.)
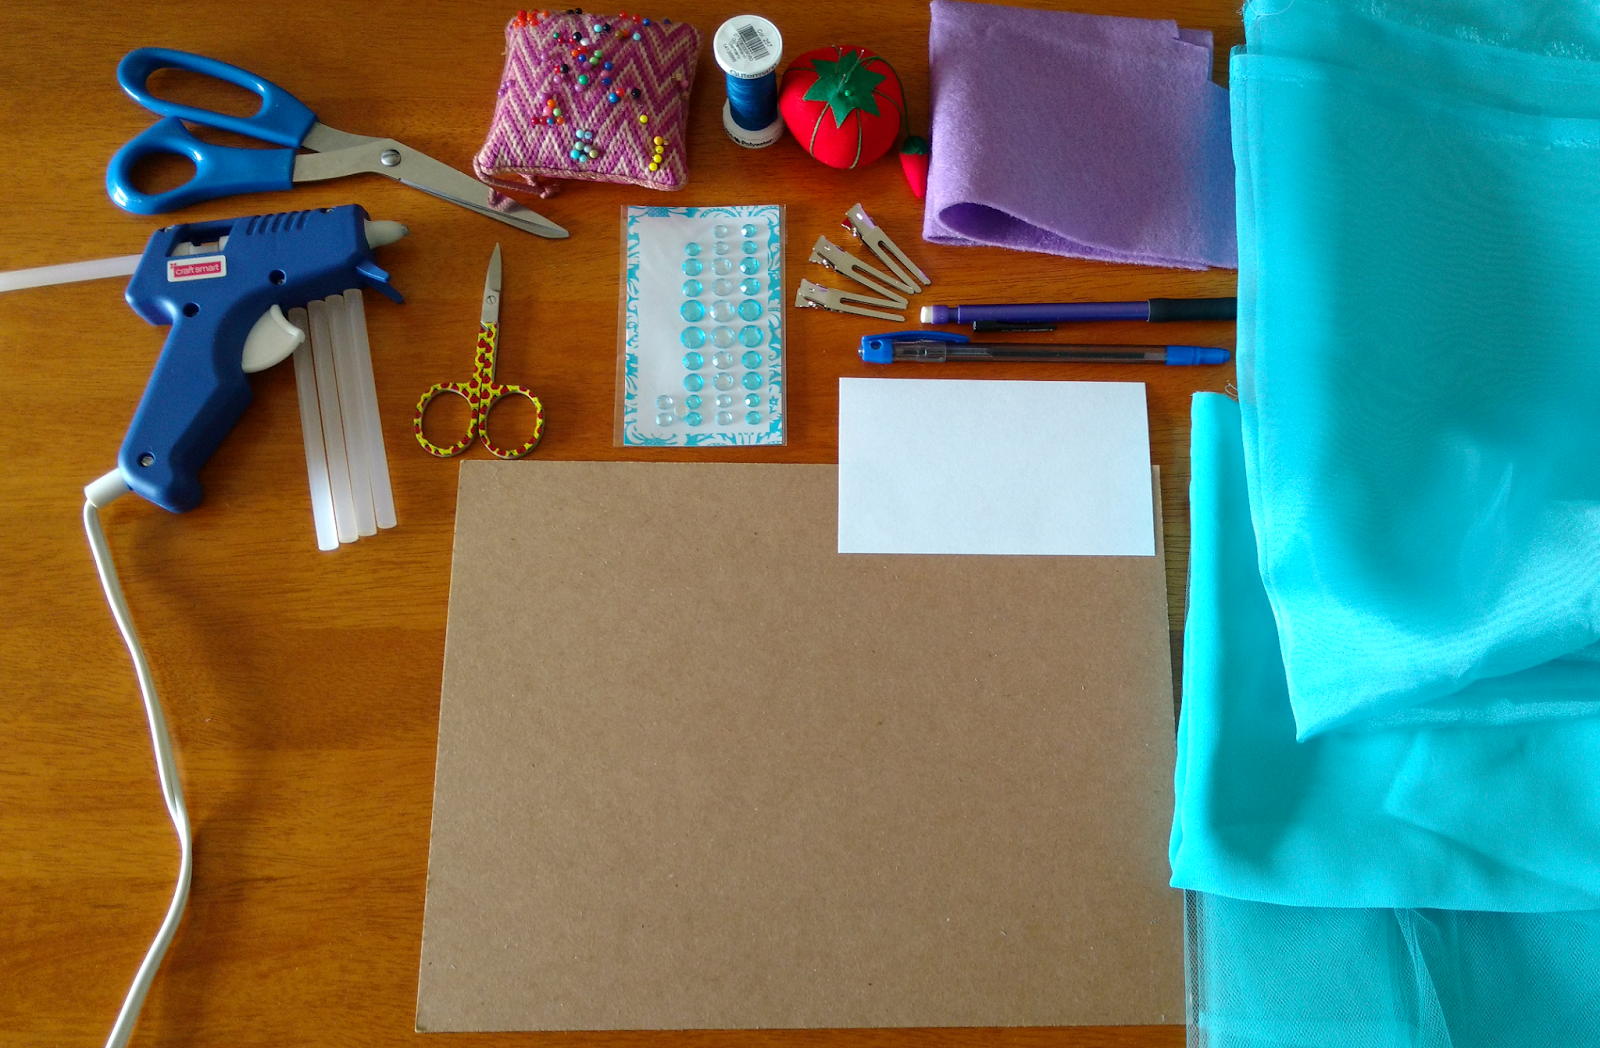 |
| All the Supplies ready to go! |
Directions and Tips:
I recommend taking a look through all of the directs to get a grasp of what we will be doing. Happy Crafting!
1. Choosing your Fabric:
Before you start cutting you need to choose your materials and colours. We chose three different fabrics so that we could layer them to change the texture and weight of the flower and provide a little more depth. By all means you can use one main fabric; however, this tutorial will feature three.
We used organza, tulle and chiffon for a little weight, we found these all at fabricland in Ontario.
I recommend looking around and browsing the feel of different fabrics to feel the weight and drape/ stiffness of the fabric. Enjoy being in the fabric store, get used to the feel of the different fabrics and it will give you a better understanding of what you would like your flower to be. Happy Hunting!
2. Designing your Template:
We needed three different sizes of flowers for the different clips and for the sash. Each layer of fabric was cut using a template. The template was used to maintain a similar shape for all of the petals. Start by choosing the shape of the Petal you want and in the size you want. You can practice a few times on the white paper and once you have designed one petal that you would like for the shape of all of your petals we cut it out.
 |
| This is petal shape we used for all three sizes, we changed the size for each. |
***Keep in mind that the more intricate your petal is the more difficult your future cuts will be***
Next you will trace the petal 5-6 times turning it as you go to create the whole flower shape. Your petals can be as close together or as spaced out as you would like them. You can always try out a few on the paper if you have a limited supply of cardboard or poster board. Keep in mind that this is the step where you can size up or down your design. If you have a specific measurement that you need, use your ruler here to keep the design accurate.
 |
| This flower is starting to take shape!!! |
*** One Big Tip: use a cardboard that is easily bendable, it can have some structure but make sure that it is not too thick or you will have a very hard time with the next steps. ***
3. The Pre-Cutting Phase
Now that you have your template and you know the size of your flower, get your fabric out because it's Cutting Time!!
The fabric that we chose was very light so I was able to fold the fabric multiple times to do one cut so that each layer did not need to be cut individually. The amount of layers you can cut through will vary based on the fabric you have chosen. Use your discretion with how much your scissors can handle when cutting so that lines remain crisp as you cut.
Measure your template from tip to tip at the widest part. I recommend adding at least one cm to each side for cutting space. Now you will take your fabric and fold in half along the width (fold the unfinished or "selvage edges" together). Now measure the size of your flower plus the two cm added to the width and you will cut along the width of the fabric.
 |
| You can measure with the template or with a ruler, your preference. Note that the selvage to the right is still attached. I like to keep mine together so it does not unravel. |
Once you have the doubled strip you will fold the fabric however many times it allows for your design to fit. I was able to fold mine 8 times so that I was able to have 16 flowers cut out (remember it is doubled because it is folded). Now we move on to the next steps.
4. The Cutting Phase
Initially I attempted to trace each flower and hold it all together to trim and cut out the correct shapes.... Let me tell you I quickly found a better way!! ( Talk about time consuming and bad results!! Thankfully I did not take picture of that part ;))
Initially I attempted to trace each flower and hold it all together to trim and cut out the correct shapes.... Let me tell you I quickly found a better way!! ( Talk about time consuming and bad results!! Thankfully I did not take picture of that part ;))
Lucky for you, all of the kinks have been worked out and we are on our way. Make sure that you have your pins ready. You will be pinning the cardboard template right into the, layers of fabric that you have already precut (I have used 8 layers). The pins should look something like this...
 |
| 5 Pins for 5 Petals |
 |
| This pins still allows for some movement |
***keep in mind that the more pins you have the more careful you have to be and the stiffer your template becomes. I like my templates somewhere in the middle so that there is some movement with the structure to work with.**
Now we trim. I used embroidery scissors to do my trimming as they are very easy to work with in small spaces and they are very sharp and precise with small cuts and tricky fabric. If you do not have embroidery scissors you do not need to run out to grab them, you just need to be more careful with the larger craft scissors.
***The Chiffon has less crisp edges as it moves more and is a heavier weight of fabric. I recommend using less layers while cutting the chiffon.***
*** Tip: Make sure that you cut slowly so that you do not cut the template or damage the fabric design. If this happens you can start over and get a little more practice with initial steps ;).***
 |
| This is the cut Tulle, 8 layers all together. |
If you want to make the exact flowers, I used 8 layers of all three fabrics. In total for one flower I had 24 layers, you can do more or less but those amounts worked out really well for me.
5. Layering Stage
Before we start make sure to have your sall piles of fabric all ready for the layering part.
 |
| The Three Layers of Fabric! |
Now that you have all of your individual pieces cut out we will begin to layer them. You will be alternating all three in order of Organza, Chiffon and then the Tulle. Make sure to alternate the direction of the petals so that you can see each layer as you move on. If you don't stagger the directions of the petals you will not be able to see each layer and get the added dimension for the flower. So there you go...Easy as pie, you keep layering until all of your 24 cut outs are part of your flower tower ;).
 |
| The Flower Tower!!!! |
 |
| Tower of Flower Petals :) |
6. Sewing Stage
Now that you have your flower tower all lined up you will need to get out your thread and sewing needle. This is the part where we make sure that the layers stay together and we are able to give it shape. If you do not feel comfortable using a sewing needle then you are able to use glue between each layer. However, make sure that you only place a little glue or you will limit the movement of your flower. Additionally, I wanted to note that you will have a harder time adding the final shape to your flower with the glue.
Prepare a few inches of thread with a knot at the end and hold the tower. You will be placing the knot down the front and centre of your flower so that we will be creating a small centre for your decoration to rest later. Make a few stitches back and forth to secure the centre.
 |
| Start Sewing right in the centre |
 |
| All secure in the centre |
Once your centre feels secure and it is not shifting a lot, you will being to push up the sides of the flower to give it some shape. I always start from the bottom to make a "V Shape".
Once this shape created you will thread the flower with the needle right at the base stitching the flower into the shape you want. It is alight to go right across your flower just be sure to keep the stitches low so that you wont be able to see them later. We Are almost done! Can you see your flower taking shape????
 |
| The Flower with some Base Volume! |
7. Hot Glue and Final Stage
Make sure to have your felt, hair clip and glue ready. Be careful with the hot glue and it can burn your fingers even through the fabric. Take your felt fabric and determine how much coverage of the bottom of the flower you want. Mostly, the felt allows you to hide your stitches and provides a great material for adhering the flower to the metal of the clip. Once you have the felt cut out, place glue on the felt and place onto the base of the flower. Keep in mind that you can push down from the centre of the flower but make sure to maintain the shape of your flower while pressing.
 |
| Felt on and Now for the gem and the clip! |
To attach the decoration you will place a dab of hot glue onto the decoration and place it into the centre and hold. Now you can fluff and primp your flower and get it ready for the final step or the hair clip!
 |
| Gems on the Finished Clips |
***If your stitches come loose when you are attaching the base this is fine and do not worry you can wait until the glue has cooled (do not try and rip it off as it will damage the fabric.) Once the flower is safe to handle again you can begin stitching again and make sure to tie off your thread well so that the stitches stay!***
8. Attaching The Clip:
To attach the Flower to the clip all you need to do is place a small amount of glue onto the flat part of the clip and press the flower on to it. As the glue is cooling you will be able to move and direct the flower to where you would like to put it. Add you final touches and primps and you are done!!!
 |
| Clip is on and the glue is cooling. |
Way to go!! Thank you for following along and I hope that thee clips add a great accent to your collection!
Styling your new clips:
You can wear them with your hair down behind one ear, or in an up-do or with your hair half pinned back. I would love to see all of your pictures of you try this tutorial.
 |
| Enjoy your new Hair Clips!! |
*** Please note that these designs were created for a tutorial only. Reference this blog if you would like to share. These designs are original and were made for the enjoyment of others please be respectful when sharing and producing these designs***
-If you have any questions please contact me-
Happy Crafting!!
No comments:
Post a Comment